Tuesday, June 27, 2006

Sauteed Green Beans and Red Onion

Prep Time: 10 minutes
Cook Time: 15 minutes

Grade: B+

Make Again: Yes

Recipe Source: Everyday Foods (April 2004)

I give this recipe a B+ because I don't end up craving this recipe, but perhaps that isn't fair. I don't generally crave green beans. As far as simple vegetable recipes go, this is a very good one, and the red onion and balsamic vinegar add a lot of flavor. I find that 1 tablespoon of oil is enough, and 2 tablespoons would actually make this too greasy for my tastes.

Monday, June 26, 2006

Father's Day Menu


Chips and Guacamole
Stewed Pinto Beans
Chicken Fajitas
Strawberry Cream Cake

This was a good spring/summer menu. The Guacamole is easy to put together right before serving. The pinto beans can be mostly made in a crock pot (with a little stovetop work at the end), and the fajitas are done on the grill. The cake may be made ahead of time and put in the refrigerator for 4 hours or so.

If serving vegetarians or someone who doesn't eat pork, I would separate out some of the beans, before adding the bacon. Other than that, I think the menu is flexible enough to serve people with different tastes, since the various veggies, beans and chicken can be combined in any way with the tortillas and miscellaneous toppings, like avacado, cheese, sour cream, etc.

Timing:
2 or more days before:

  • Make cake ahead of time and double wrap and freeze.

    Day of meal:
    Morning:
  • Start pinto beans in crock pot (needs 4 hours to finish)

    4-6 hours before:
  • Take cake out 2 hours before putting together.
  • Prep fajita veggies and chicken. Wrap separately.
  • Prepare marinade and store in refrigerator.
  • Prepare Strawberry filling.

    2-4 hours before:
  • Make cream for cake.
  • Prep ingredients for guacamole, except avacados.
  • Assemble strawberry cake and store in refrigerator.

    45 minutes before:
  • Start cooking bacon and onions to finish stewed pinto beans.
  • Put chicken and veggies in marinade, separately (saving some for later) 15 minutes before grilling. Turn on grill.

    20 minutes before:
  • Start grilling chicken and veggies
  • Finish up beans

    Guacamole can be put together whenever you want to serve, very quickly.

    Remove cake a few minutes before serving.
  • Sunday, June 25, 2006

    Strawberry Cream Cake

    Prep Time: 18 minutes
    Bake Time: 30-40 minutes
    Cool Time: 2 hours

    Filling Time: 15 minutes
    Sit Time: 1 hour
    Cook Time: 5 minutes
    Cream Time: 7 minutes
    Assemble Time: 10 minutes

    Grade: A+

    Make Again: Yes

    Recipe Source: Cook's Illustrated Magazine (May 2006)

    My first layer cake. I used a cheap torter that I bought at Michaels to cut it, which was very helpful. It was still lopsided because I hurried putting it together, but I still think it looked nice.

    I skipped the Kirsch and that was fine. I had lots of leftover strawberry and cream filling, and I'm not sure if I needed more. (I mixed the two leftovers together and froze for some strawberry ice cream, which was very good!)

    I'll definitely make this again, but next time might make a 7" cake instead and cut the recipe in half, unless I am serving a big crowd. The leftovers were good the next day though, and I froze some in pieces and it has still tasted pretty good (although not as great as fresh.) This can be put together ahead of time and still taste good.

    Thursday, June 22, 2006

    Chicken Fajitas

    Prep Time: 45 minutes
    Marinate Time: 15 minutes
    Cook Time: 15-20 minutes

    Grade: A

    Make Again: Yes

    Recipe Source: Cook's Illustrated Magazine (September 2005)

    This recipe took me a while to prep, but I was making a double recipe, and my chicken was a mess and needed a lot of trimming. I think the prep time will normally be less. (I'll update, next time I try.) These fajitas were really tasty and got a lot of compliments when I made them for a family dinner. I'll definitely make again, because much of the work can be done early. The grilling is pretty easy. I didn't follow directions exactly (too much going on for me to read), but everything turned out great anyways.

    Wednesday, June 21, 2006

    Stewed Pinto Beans

    Prep Time: 5-10 minutes
    Bean Time: 70 minutes or 4 hours (slow cooker)
    Cook Time: 25-30 minutes

    Grade: A

    Make Again: Yes

    Recipe Source: Restaurant Favorites at Home (modified)

    I have changed this recipe a little so that it is easier, for example using canned diced tomatoes with chilis, so I can avoid chopping onions and peppers. I also tried making the beans in a crock pot, so I have less stove time and heat in the kitchen. It worked pretty well in the slow cooker, but of course, takes longer.

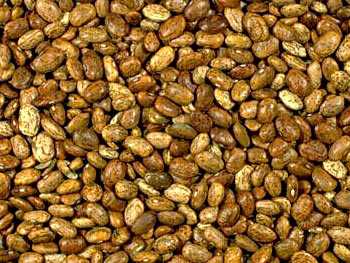
    I prefer to make this with a full pound of pinto beans, because I buy the bags, and dont' want to keep 1/2 c. of beans laying around.


    Stewed Pinto Beans in a Slow Cooker

    NOTE: The original recipe doesn't tell you when to cut the bacon, but tells you to leave the bacon in when adding onions. I assume that means you should cut bacon when raw. I cooked bacon whole and crumble it later, which is easier.

    1 lb dried pinto beans, picked over and rinsed.
    4 medium garlic cloves, pressed through a garlic press
    Salt
    3 slces thick bacon
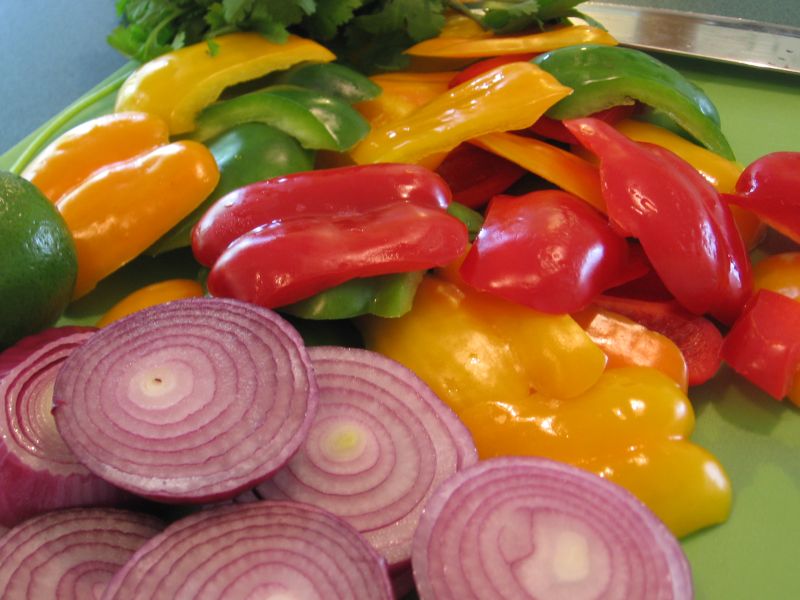
    1 small onion, cut into 1/4" dice (about 1 c.)
    1 15 oz can petite diced tomatoes with chilis (hot), drained (or 3 plum tomatoes, seeded and diced, and 2 jalapenos, minced)
    1/2 c. chopped fresh cilantro leaves

    1. Put beans and 6-8 cups of water (enough to cover beans by an inch or so). Cook on HIGH for 1 hour.

    2. Add minced garlic and 1 1/4 teaspoon salt, stir, and continue cooking on HIGH for 2-4 more hours, until beans are tender.

    3. Drain beans and reserve the liquid. (Or do as I did, and use a ladle to remove most of the water and leave beans in crock, to keep warm.)

    4. Cook bacon in a Dutch oven over medium heat until browned and crisp, about 10 minutes.

    5. Remove bacon, and drain all but 1-3 T. of fat, depending on your preferences. Drain bacon on paper towels.

    6. Add onions to pan, and cook over medium heat until softened and golden, about 3 minutes.

    7. Add tomatoes and jalapenos and continue cooking about 10 minutes.

    8. Crumble drained bacon and return to pan.

    9. Combine beans and tomato mixture and cook for 5 minutes more to blend flavors.

    10. Stir in chopped cilantro and season with salt and pepper.

    I think the bacon adds a lot, but it does become unappealing in leftovers. I am wondering if saving it for sprinking on top would be best, if it won't all be eaten when first cooked. This makes a large amount of beans, so it is likely there will be leftovers. I may try this next time I make this.

    Tuesday, June 20, 2006

    Guacamole

    Prep Time: 10 minutes

    Grade: A+

    Make Again: Yes

    Recipe Source: Cook's Illustrated Magazine (May 1999) and The America's Test Kitchen Family Cookbook

    This is my favorite recipe for Guacamole and so very easy. I will make it again and again.

    Cookbook - The America's Test Kitchen Family Cookbook

    If I could only own one cookbook, this would be the one. That is because it is the most comprehensive book I own, and it also comes from my favorite source of recipes (Cook's Illustrated, of course.)

    Lots (but probaby not a majority) of the recipes in here come from the magazine. Some of them are simplified, just slightly, and some are simplified greatly. Some recipes come from their newer magazine, Cook's Country, and some come from their various cookbooks.

    This cookbook does not include the lengthy discussions, how's and why's of the recipes, but just gives you what you really need to know. It is easier to read and follow than any of their other cookbooks, and it has lots and lots of photos, many of which are used to describe technique. I have the first edition, and the pages are a little thin, and it is in a 3 ring binder, so it isn't as sturdy as I might like, so this one may need to be replaced in the future. There is a newer version out now, which I believe is more sturdy.

    To see the recipes I have tried from here, click on the "atkcb" label below.

    Monday, June 19, 2006

    Chocolate Sheet Cake

    Prep Time: 18 minutes
    Bake Time: 40 minutes
    Cool Time: 1 hour

    Grade: A

    Make Again: Yes

    Recipe Source: Cook's Illustrated Magazine(January 2001) and Baking Illustrated

    I think this was my first ever Cook's Illustrated recipe. It was such a success, and I enjoyed reading that first magazine so much that I ended up purchasing all the previous issues in bound books. (I no longer have all those books, but I did read them all.)

    I am not a big cake person, because I prefer moister and more dense desserts. This cake is very good, however. It is moist and has a rich chocolate taste.

    Although I have made this cake many times, it isn't a frequent thing, and I always end up overbaking it slightly. I think I am fooled by the fact that it still seems undone when I press on the top. It doesn't spring back as much as I think it should (which is silly since I am not a baking expert). I need to pay more attention to my cake tester which I put in at an angle (thanks to a tip I found on the CI forum.) Although slightly overbaked on the sides, this cake is still excellent.

    I am still working on finding a good frosting recipe that is not too rich, but better than those fluffy frosting that supermarket and some bakery cakes have. With this cake I resorted to canned frosting! It was for my nephew, and I knew he would prefer it.

    I think my decorating technique has improved, but I should smooth the base frosting out better before I start the decorating.

    Thursday, June 15, 2006

    Cookbook - Baking Illustrated

    This book is by the editors of Cook's Illustrated Magazine and includes many recipes that are found in the magazine, with some new ones added. Although there are lots of duplicates, it is nice to have all baking recipes in one spot.

    I have tried quite a few baking recipes from Cook's Illustrated over the years, and almost every recipe has been a winner. The few that were not, were just not to my tastes. It usually is not because they didn't turn out well.


    To see all the recipes I've tried that are in this book, click on the "bi" label below.

    Monday, June 12, 2006

    Multigrain Bread

    Cereal Time: 70 minutes
    Mix Time: 30 minutes (includes 20 min rest)
    1st Rise: 60 minutes
    2nd Rise: 30-60 minutes
    Bake Time: 35-45 minutes
    Cool Time: 3 hours

    Grade: A

    Make Again: Yes

    Recipe Source: Cook's Illustrated Magazine (March 2006)
    Recipe: America's Test Kitchen TV Show (Season 10)

    I've made this bread 3 times, and I still haven't gotten the high loaf I am looking for. The first two times I was using the wrong type of multi-grain cereal, but I had the right type this time. (Arrowhead Mills 7-grain hot cereal mix.) The loaves are not like bricks, and they are very delicious, so they are worth making. However, I would love to be able to make a loaf that is a little taller. My goal is to be able to put a standard piece of round turkey lunchmeat on it and only have a little overhang. Right now there is a good inch of the top that doesn't fit.

    This time I did let the bread rise twice as long for the 2nd rise. I think I need to let it go even longer. I will reread the thread in the Chat section of CI's web-site to see if I get any other ideas.

    One other note - although I love the oatmeal on the loaves, it seems silly for me to add it, since it always falls off when I cut the bread. I tried spraying the loaves with oil spray, and it didn't help. Maybe an egg wash?

    Sunday, June 11, 2006

    Pasta with Onion, Bacon, and Goat Cheese

    Total Time: 25-35 minutes

    Grade: A

    Make Again: Yes

    Recipe Source: Everyday Food (March 2004)
    (See my index of EF favorite recipes here.)

    This is one of the many great pasta recipes I've tried from Everyday Foods magazine. It is one of those recipes that you can almost get done in the time it takes to boil the water and cook the pasta. There are basically 6 ingredients: pasta, bacon, red onions, garlic, fresh thyme and goat cheese. They make a great combination, and the goat cheese and some pasta water create a quick and creamy sauce.

    The recipe calls for cooking the onion for up to 20 minutes (after the bacon), but I sometimes increase the heat a little, and cook less. It helps if the onions are sliced thin. I find it best to start the bacon cooking, then get the water boiling.

    Saturday, June 10, 2006

    Rustic Potato Loaves

    Potato Prep: 3 minutes
    Potato Cook: 20 minutes
    Potato Cool: 20-30 minutes
    Mixing Dough: 10 minutes
    Kneading: 11 minutes
    1st Rise: 20-30 minutes
    Shaping: 5 minutes
    2nd Rise: 20 minutes
    Baking: 45-50 minutes
    Cool: 20 minutes or more

    Grade: A

    Make Again: Yes

    Recipe Source: Baking with Julia (contributing baker Leslie Mackie)

    It might seem like this is a complicated recipe if you look at all the times listed above. But when you consider that most of the time is unattended, and that this recipe creates a unique type of bread, it really is not so bad. The potatoes are what add an hour to the time. If you had the cooled and cooked potatoes, you are actually spending less than 2 hours from start to tasting, to get this rustic bread.

    This bread has a unique flavor from the use of 1.5 pounds of potatoes. It is a great flavor, in my opinion, just different than you might expect. The crumb on this is pretty tight and this makes a great sandwich bread. I have also enjoyed eating it plain.

    I tried the bread after the required 20 minutes of cooling, and after it completely cooled, and I think it tasted best after completely cooling. It really still tastes great the next day too.

    The recipe explains the process very well and I knew what to expect about this at first very dry dough, and then later wet dough. However, there seems to be one mistake, in that they never tell you to peel the potatoes after cooking them. You are told to cook them with the peel on, but I cannot imagine that you are to mash the potatoes with them on. Maybe that step is in there, but I can't find it!

    Friday, June 09, 2006

    Alsatian Onion and Bacon Tart

    Dough Prep: 10 minutes
    Rest Time: overnight
    Prep Time: 50 minutes
    Bake Time: 5-6 minutes at 500 degress (longer with colder oven!) per half recipe

    Grade: A

    Make Again: Yes

    Recipe Source: Restaurant Favorites at Home

    This recipe is really delicious if you like the flavor of bacon. It isn't super quick, but you can actually make all the pieces before hand, and put it together later. It would make a great appetizer for a dinner party, you would just have to roll out, add toppings and bake. Rolling is easy because you do it on top of parchment paper which goes right onto the baking stone.

    I'm having trouble getting my oven to 500 degress, so my baking time took longer, and I probably didn't get as much browning as I should have.

    I used the thick bacon, and before cooking onions, I drained off all except about 1 T. of the fat. Done this way, you still get lots of great bacon flavor (from bacon and onions) but this recipe is actually a lot lighter than you would think. I think it comes to around 400 calories per tart (the recipe makes 4) and can make a nice lunch or dinner.

    Thursday, June 08, 2006

    Buttermilk Scones

    Prep Time: 20 minutes
    Bake Time: 10-12 minutes

    Grade: A

    Make Again: Yes

    Recipe Source: Baking with Julia (contributing Baker Marion Cunningham)

    I've never seen or heard of scones being rolled before, so I wanted to try this version, because it seemed different, and sounded good. I had some trouble with this, because my dough got soft quickly (perhaps my butter was not cold enough) and I wasn't sure if it was OK to cool it off in fridge before continuing. I think it is OK, and I will try that next time if necessary. The other trouble I had was that I didn't measure out the jam, and I ended up using too much. I had a thought when I was spreading it on, that it might ooze out when I started to roll it, but that didn't stop me. Next time, I will keep a border of more than an 1" on outside edge, so there is room for the jam to go when rolling up. I also think it would be nice to spread the tops with the extra melted butter which I had, and then sprinkle with a little sugar. If done properly these could be very pretty. Regardless of the looks, they tasted great and I will try this recipe again.


    Update: I tried these a second time and had better luck. I stored dough in the freezer while I prepared the filling ingredients, and I used less jelly. The picture at top, is from my second attempt. This time, my swirls where much prettier, and I used Turbinado cane sugar for topping which gave a nice little crunch.

    Tuesday, June 06, 2006

    Cookbook - Restaurant Favorites at Home

    This book is by the editors of Cook's Illustrated Magazine (as many of my cookbooks are.) However, it is slightly different than the other cookbooks, because most of these recipes are unique to this book.

    Most of the recipes I have tried have been great. Some are more complicated than you might want to tackle, but they are trying to recreate restaurant specialties that you would find at fine restaurants across the country. These recipes are not recreating food you would find at chain restaurants.

    Recipes I've tried and written about:

    Spicy Chili-Fried Edamame

    Prep Time: 14 minutes
    Cook Time: 5 minutes boil, 5 minutes stir-fry

    Grade: A+

    Make Again: Yes

    Recipe Source: Restaurant Favorites at Home

    This is one of my all-time favorite recipes. This is a very addictive snack, with a spicy and sweet component. I have altered the original recipe to use less oil (2 T instead of 4 T.) You need to be careful when using less oil when you add the ginger and garlic so it doesn't stick to pan and burn. Otherwise, using less oil works well.

    You have just about enough time to prep all ingredients while water is heating up to boil.

    I have served this as an appetizer and had all my ingredients ready including the edamame boiled, and just done the stir fry at the last minute. The cooking time might need to be slightly longer if ingredients are cold.

    NOTE: In case you have not eaten edamame in the pods before, the pods are inedible. These are eaten by putting in mouth closing teeth and pulling pod back out. This way you get the beans and the spicy sauce.

    Spicy Chili-Fried Edamame Recipe

    1 pound frozen edamame in their pods (frozen soy beans)
    1 tablespoon salt
    2 tablespoons peanut oil
    2 serrano chiles, seeded and minced
    2 medium cloves garlic, minced or pressed
    1 2" piece of ginger, peeled and minced/grated (about 2 tablespoons)
    3 tablespoons soy sauce
    1 tablespoon oyster-flavored sauce
    1/2 teaspoon toasted sesame seed oil

    1. Bring 4 quarts of water to a boil in a large pot. Add edamame and salt, return to boil, and cook for about 6 minutes, until beans inside are tender. Drain, and refresh with cold water to stop cooking.

    2. Mix soy sauce, oyster sauce and sesame oil in small bowl and set aside.

    3. Heat 1 tablespoon of oil in 12" non-stick skillet over high heat, until shimmering. Add edamame and stir-fry for 2-3 minutes.

    4. Push beans to the side and add 1/2 tablespoon more oil and the chiles. Stir fry for 30 seconds, stirring constantly.

    5. Add 1/2 tablespoon more oil and the garlic and ginger. Stir constantly for about 1 minutes.

    6. Add soy sauce mixture and cook while stirring until liquid has evaporated, about 30 second.

    Sunday, June 04, 2006

    Swedish Oatmeal Hardtack

    Prep Time: 8 minutes
    Fridge Time: 30 minutes
    Roll and Cut Time: 5 minutes per sheet (3 sheets)
    Bake Time: 10-12 minutes

    Grade: A

    Make Again: Yes

    Recipe Source: Baking with Julia (contributing baker Beatrice Ojakangas)

    I never thought I would make my own crackers, but I saw this recipe and it seemed easy, and I have some buttermilk on hand, so I thought I would try. It was easy, and these were good.

    You basically mix up the dough (butter, shortening, sugar, flour, oatmeal, buttermilk, salt and baking soda), let it sit in refrigerator for 30 minutes, then roll and cut. Rolling out is really not too hard. I tried on parchment and directly on the sheet, and both were fine, so I would skip the parchment next time. Instead of flouring rolling pin, I used a sheet of plastic wrap, and peeled it off when done.


    The recipe says it is better to take the crackers out sooner rather than later, but I disagree. I think they tasted best when they were well browned. These are very tasty little crackers with a touch of sweetness. I might try making with a little less sugar next time.

    Saturday, June 03, 2006

    Blueberry Coffeecake

    Prep Time: 20 minutes
    Bake Time: 45-50 minutes
    Cool Time: 1+ hour

    Grade: A

    Make Again: Yes

    Recipe Source: Everyday Foods, Cook's Illustrated and Me

    This recipe is an alteration of a recipe I found in Everyday Foods magazine. I love the original recipe, but the amount of streusal on it is obscene, and not really necessary. In the past, I have always cut that part of the recipe in half. This time, I decided to take a hint from Cook's Illustrated Best Light Recipe, and use melted butter for the streusal instead of cutting in cold butter. This allows you to use a lot less butter. It is a good technique and the streusal turned out very good, and for me it was just the right amount.

    I usually get 12 servings for this recipe, instead of 9. With the smaller serving size and the different streusal topping, the calories per piece for this cake end up being about 230 intead of the 405 noted in Everyday Foods. Pretty good!

    Blueberry Coffecake

    Cake:
    1 1/2 cups flour plus 1 teaspoon
    1 1/2 teaspoons baking powder
    1/2 teaspoon baking soda
    1/4 teaspoon salt
    1/4 teaspoon allspice
    4 tablespoons unsalted butter, softened, plus more for pan
    3/4 cup sugar
    1 egg
    2/3 cup buttermilk
    1 1/2 cups blueberries

    Steusal:
    2 1/2 T. butter, melted
    1/3 c. flour
    1/3 c. brown sugar
    pinch salt
    pinch cinnamon

    1. Preheat oven to 350°. Butter and flour a 9-inch square baking pan.
    2. Topping: Stir together flour, brown sugar, and salt in a small bowl. Stir in melted butter. Small little lumps will form as you stir.
    3. In a medium bowl, whisk together 1 1/2 cups flour, baking powder, baking soda, salt, and allspice.
    4. In a large bowl, beat the butter and sugar with an electric mixer until fluffy. Add egg; beat well.
    5. Add flour mixture and buttermilk alternately until just combined. (Batter will be very stiff.)
    6. In a large bowl, toss the blueberries with 1 teaspoon flour. Fold blueberries into the batter; spoon into prepared pan and level out batter.
    7. Sprinkle cake with streusel topping.
    8. Bake until golden brown and a tester comes out clean, 45-50 minutes. Let cool completely.

    Friday, June 02, 2006

    Magazine - Cook's Illustrated

    NOTE: If you got here by clicking on a link hoping to see the recipe, go back, and try clicking on the second link with the magazine's publish date which should take you to the recipe. However, note that Cook's Illustrated is a pay site, so you need to be a member to see the recipe. I think it is worth the price to join (currently $35 a year, I believe), as I explain below.

    I've always liked to cook, but when I discovered Cook's Illustrated Magazine, my cooking skill jumped up a level or two or three. I learned a lot by reading the magazine cover to cover (which is easy, because it is only 32 pages) even if the recipe didn't suit my tastes. I don't know what my success rate is really for the recipes I have tried, but I am guessing it is about 90% of the recipes I have tried, I have really liked and wanted to make again. It is definitely a higher success rate than any other recipe source I've tried.

    When I discovered the magazine (in 2000 I think) I went ahead and purchased used versions all previous issues in hardback. I have since sold most of these myself, but not until I read them all, and tried the recipes I wanted.

    I don't subscribe to the print version of the magazine anymore, because I found that they were repeating things they had already done. I do however, subscribe to the paid web-site (which has a frequently updated free recipe or two on it always) , so I have access to all of their recipes from the magazine. It is nice to be able to search for recipes and print out a quick copy whenever I need. A newer feature of the paid web-site is the 1-3 minute videos explaining the recipes. These are terrific.

    If you can only afford one, I suggest going on-line, because that gives you 10+ years worth of recipes and the videos. They even include the detailed articles on the web now, so you don't miss a thing by reading on-line, unless you prefer a hard copy for reading.

    Cook's Illustrated has also produced quite a few cookbooks, and it's own TV show, and there is a lot of overlap in the recipes, but sometimes they are different. It can get confusing trying to keep track of all the variations. I have a few, but don't purchase all of them. Recently, they have started to publish a "Best of Year" series, which is 100% duplication, but I prefer. The layout is very nice and it has pretty pictures, which I love. It highlights the best recipes from there magazines and the books recently published. I hope they continue this series, because I would prefer to purchase them over the other cookbooks.

    To see recipes I've reviewed from Cook's Illustrated magazine, click on the "ci" label below.

    Thursday, June 01, 2006

    Triple Citrus Bars

    Crust Prep: 8 minutes
    Crust Bake: 18-20 minutes
    Filling Prep: 18 minutes
    Filling Bake: 15-20 minutes
    Cool Time: 3+ hours

    Grade: A

    Make Again: Yes

    Recipe Source: Cook's Illustrated Magazine (July 2006)

    I sometimes cut bar cookies with a biscuit cutter and decorate the top, and I thought that would be nice with this bar cookie. However, the reality was that it was very hard to get the dessert out in one piece. The bottom separated from the top, and the top didn't look as pretty as I had to push on it. If I had biscuit cutters without handles on top, I could push up from the bottom and it would probably work better. I tired with a flower shaped cookie cutter and it almost worked, but a petal or two broke off.

    No matter how they look, these taste great. They are not too sweet, and not too tangy (because of the orange mixed in.) Sometimes citrus desserts can taste a little metallic to me, but this is not the case with this dessert. I love the little flecks of zest that you can see in the bars.